When you want to set the margin for an HTML element, you have two options. First, you can use the margin sub-properties i.e. margin-left, margin-right, margin-top & margin-bottom to set the margin for each individual side.
The second option is to use the margin shorthand property. The margin shorthand property allows you to set the margin for all sides of the element in just a single line of code, instead of specifying it for each side individually.
The margin is a shorthand for the following four individual properties:
margin-top– Specifies the margin for the top side of the elementmargin-right– Specifies the margin for the right side of the elementmargin-bottom– Specifies the margin for the bottom side of the elementmargin-left– Specifies the margin for the left side of the element
The order of each property in the margin shorthand is very important because it determines which margin will be applied to which side of the element. If the values are not specified in the correct order, it can result in unexpected and incorrect margins.
The margin property can take one to four values at a time.
Let’s see how we can use use the margin shorthand to specify the margin for each side of the element in just a single line.
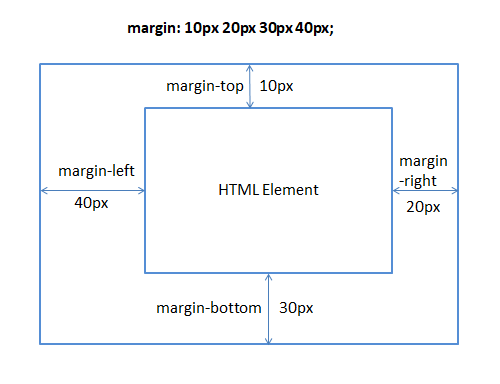
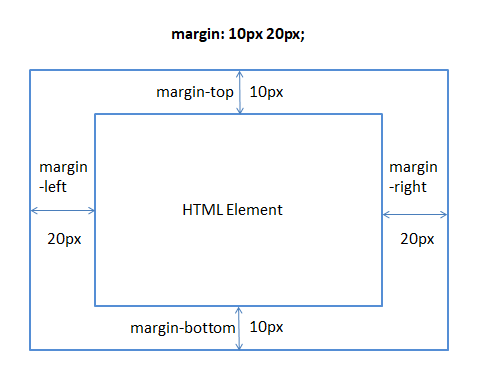
CSS Margin Shorthand with 4 Values
When you specify four values to the margin shorthand, the first value sets the top margin, the second value sets the right margin, the third value sets the bottom margin and the fourth value sets the left margin of the given element.
You can remember the order by moving in the clockwise direction starting from the top side of the element i.e. top, right, bottom & left:
margin: top right bottom left;
For example, if we apply the margin: 10px 20px 30px 40px; on an element, it means:
- the top margin will be 10px
- the right margin will be 20px
- the bottom margin will be 30px
- the left margin will be 40px
Refer to the image given below:
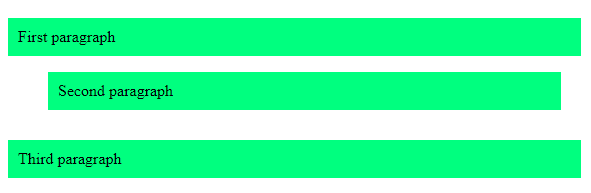
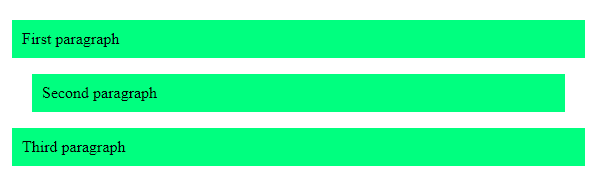
Let’s take an example, which has three paragraphs(<p>) and try to put a margin on the middle paragraph using the margin shorthand:
<div>
    <p>First paragraph</p>
    <p class="para">Second paragraph</p>
    <p>Third paragraph</p>
</div>
Now, apply the below CSS to put the margin:
/*Put margin on each side of the middle <p>*/
.para{
   margin: 10px 20px 30px 40px;
}

p{
   padding: 10px;
   background: springgreen;
}
Output:
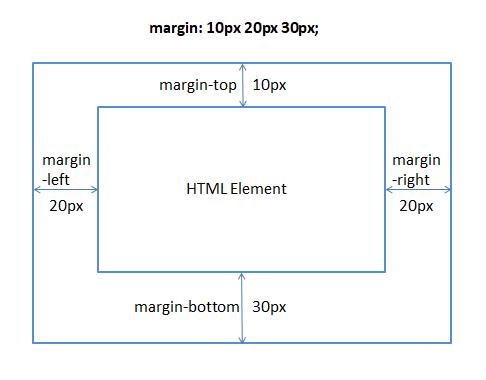
CSS Margin Shorthand with 3 Values
When you specify three values to the margin shorthand, the first value sets the top margin, the second value sets the right and left margins and the third value sets the bottom margin.
margin: top left&right bottom;
For example, if you apply the margin: 10px 20px 30px; on an element, it means:
- the top margin will be 10px
- the right & left margins will be 20px
- the bottom margin will be 30px
Refer to the below image for clarification:
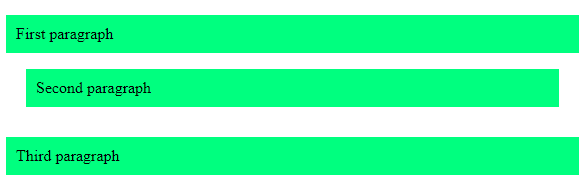
Example:
<div>
    <p>First paragraph</p>
    <p class="para">Second paragraph</p>
    <p>Third paragraph</p>
</div>
Apply the following CSS:
/* Margin shorthand with three values*/
.para{
   margin: 10px 20px 30px;
}

p{
   padding: 10px;
   background: springgreen;
}
Output:
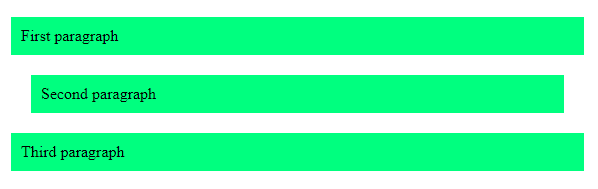
CSS Margin Shorthand with 2 Values
If you specify only two values in the margin property, the first value sets the margin for the top & bottom sides whereas the second value sets the margin for the left & right sides of the element.
margin: top&bottom left&right;
For example, if you apply margin: 10px 20px; on an element, it means:
- the top and bottom margins will be 10px
- the left and right margins will be 20px
Refer to the below image:
Example:
<div>
    <p>First paragraph</p>
    <p class="para">Second paragraph</p>
    <p>Third paragraph</p>
</div>
Apply the following CSS:
/* Margin shorthand with two values*/
.para{
   margin: 10px 20px;
}

p{
   padding: 10px;
   background: springgreen;
}
Output:
CSS Margin Shorthand with Only One Value
If you specify only a single value to the margin property, the same value is used for all sides of the element.
For example, if you apply margin: 20px; on an element, it means:
- the top margin will be 20px
- the right margin will be 20px
- the bottom margin will be 20px
- the left margin will be 20px
As there is just a single value, therefore, each side of the element will use the same value of the margin.
See the following image:

Example:
<div>
    <p>First paragraph</p>
    <p class="para">Second paragraph</p>
    <p>Third paragraph</p>
</div>
Apply the following CSS:
/* Margin shorthand with only one value*/
.para{
   margin: 20px;
}

p{
   padding: 10px;
   background: springgreen;
}
Output:
CSS Margin Shorthand Values
The margin shorthand property can accept the following values:
| Value | Description |
| length | Specifies the margin in CSS length units such as px, pt, em, rem, cm, etc. |
| auto | The browser calculates the margin for the element. |
| % | Specifies a dynamic margin which is calculated by the percentage width of the parent element. |
| initial | Sets the margin property to its default value. |
| inherit | Inherits the margin from the parent element. |
Default Value of the Margin Shorthand Property
The default value of the margin shorthand property in CSS is 0.
As we know the margin property is a shorthand for the margin-top, margin-right, margin-bottom and margin-left properties.
It means, by default, all the margin sub-properties are set to 0 or 0px for an HTML element. However, the default value also depends on the browser that you are using.
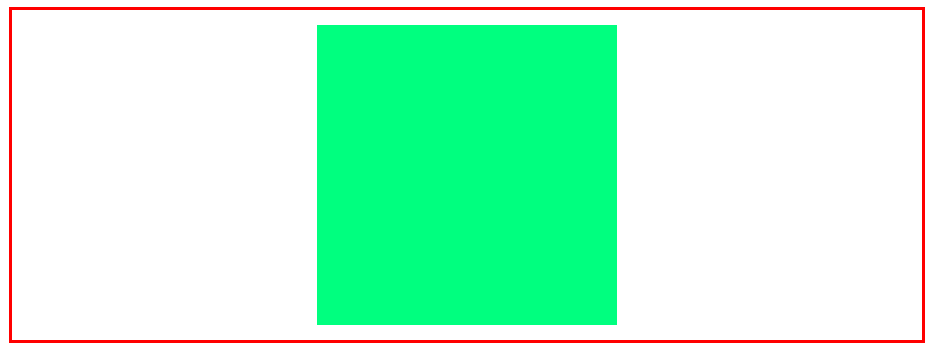
Understanding the margin: auto
When you set the margin property to auto, the browser itself calculates the margin for all sides of the element.
The browser actually calculates the remaining space within the container and splits it equally between the left and right margins. As a result, the element is aligned to the center of its container horizontally.
Let’s say we have a div element of some fixed width and height within another div element:
<div class="parent">
    <div class="child"></div>
</div>
Now set the margin of the inner div to auto. This will pull it into the center of the outer div:
.parent{
   border: 2px solid red;
   padding: 10px;
}
.child{
   width: 200px;
   height: 200px;
   margin: auto;
   background: springgreen;
}
Output:
Conclusion
In this article, we learned what is the margin shorthand property and how can we use it to set the margin of each individual side of an element in a single line rather than specifying it for each side individually.
In summary, the margin is a shorthand for the following four margin properties:
margin-topmargin-rightmargin-bottommargin-left
You can use the margin property with one, two, three, or four values. The different number of values has different rules to set the margin.
While using the margin shorthand, it is very important to put the margin values in the correct order because the order determines how the values are applied to the different sides of an element.
Thanks for reading.