In HTML, tables are used to organize and present data in tabular format on a web page. They are generally used when we want to display a large amount of data which can be sorted, filtered, compared, etc.
While working with these tables, you might sometimes need to perform some actions on the table, such as editing or deleting a row or performing some calculations based on the data in a row or in the entire table.
To accomplish this, we generally add buttons to the last column of the table. These buttons can either be added to any column while creating the table in the HTML file or you can add them dynamically after creating the table.
In this article, We will explain how you can add a button to an HTML table dynamically using JavaScript. So without further ado let’s get started.
The first thing we need is the HTML table to which we want to add the button. If you already have an existing table, just add some id to it. If not, add a new one with some id.
Along with the table, create a button also which will be used to add buttons to the table dynamically:
<div>
    <table id="userTable">
        <tr>
            <th>First Name</th>
            <th>Last Name</th>
            <th>Action</th>
        </tr>
        <tr>
            <td>John</td>
            <td>Doe</td>
            <td></td>
        </tr>
        <tr>
            <td>James</td>
            <td>Bond</td>
            <td></td>
        </tr>
        <tr>
            <td>William</td>
            <td>Smith</td>
            <td></td>
        </tr>

    </table>

    <button id="addBtn">Add Buttons</button>
</div>
Now, in the JS file, add a click event listener to the button using the addEventListener() method which will be fired every time someone clicks the button.
We want to add a button with the label ‘View’ to the last column of each row of the table whenever someone clicks on this button.
To accomplish that we have to iterate through the rows array of the table and run a for or while loop to one by one add the ‘View’ button to the last column of each row.
We will also attach a dummy function sayHi() to the ‘View’ button using the setAttribute() method. On clicking this button, a dummy message will be displayed to the user using the alert box.
Refer to the below JS code:
let buttonAdder = document.getElementById('addBtn');

// Fires on button click
buttonAdder.addEventListener('click', function (event) {

    let table = document.getElementById('userTable');
    let rows = table.rows;

    // Loop through each row(except the header)
    for (let i = 1; i < rows.length; i++) {

        let cols = rows[i].cells;
        let lastCol = rows[i]['cells'][cols.length - 1];

        // Create a new button element
        let button = document.createElement('button');
        button.innerText = 'View';

        // Attach sayHi() function to 'onclick' attribute
        button.setAttribute('onclick', 'sayHi()');

        // Append the button to the last column
        lastCol.appendChild(button);

    }
});


// Fires on 'View' button click
function sayHi() {
    alert('Hi there');
}
After running the above code, you will get the following output:

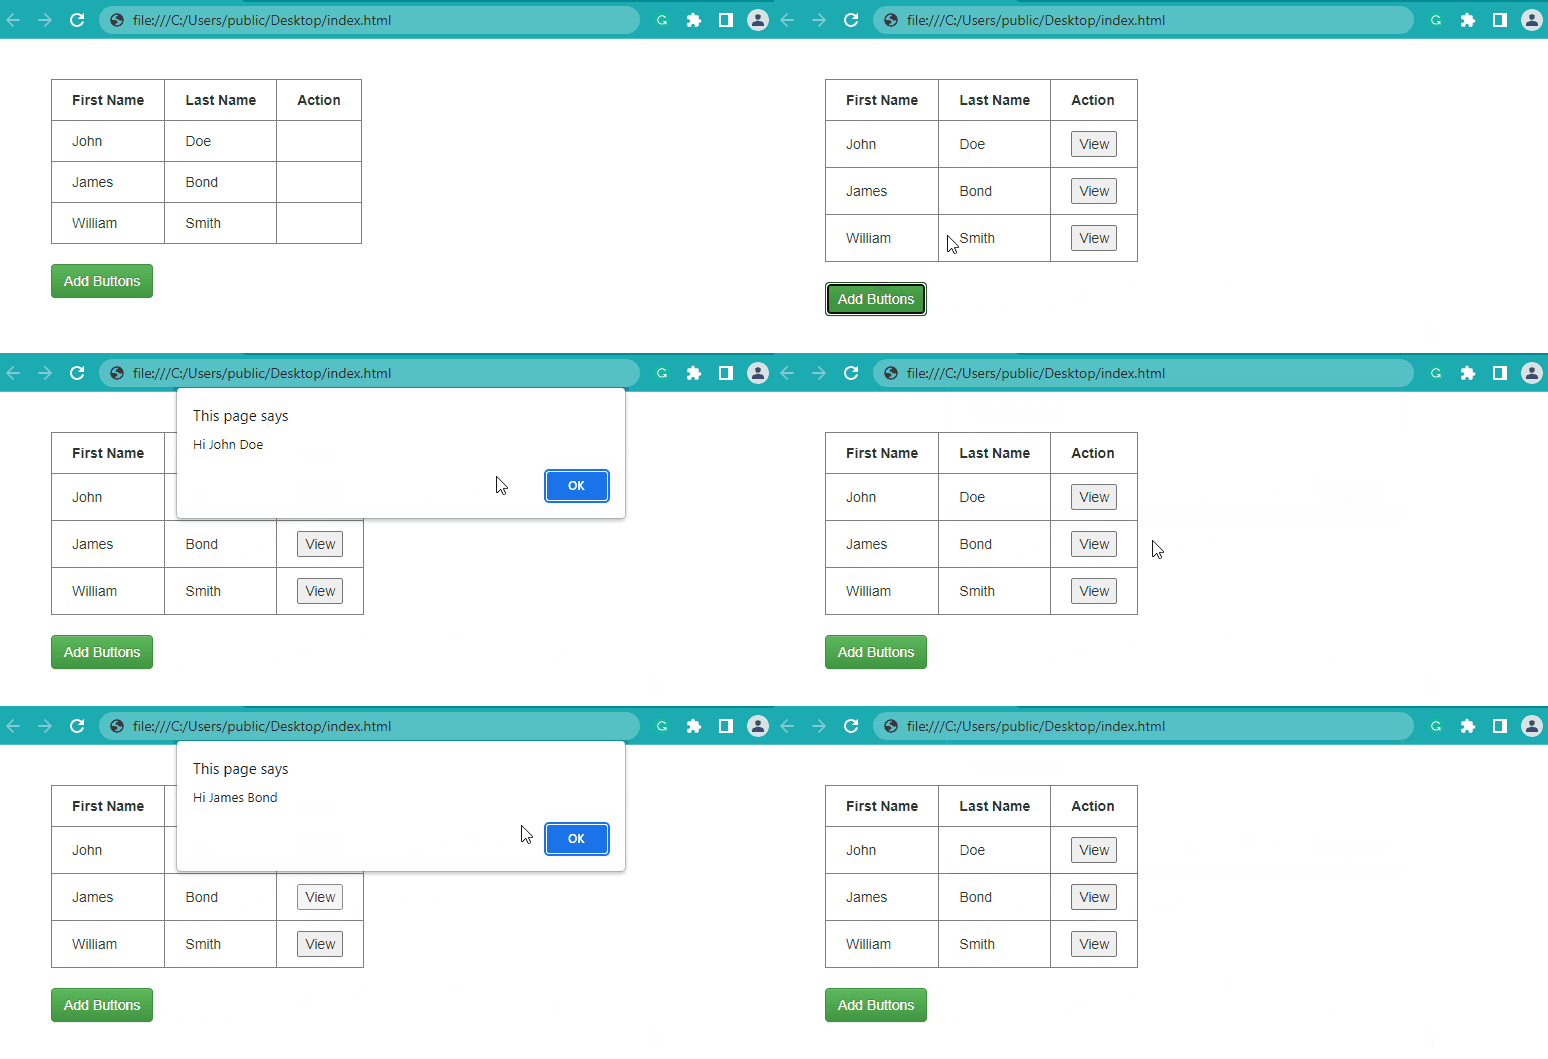
As you can see from the above output, as soon as we click the ‘Add Buttons’ button, it adds a ‘View’ button to the last column of each row. And, on clicking the ‘View’ button, it gives us an alert message with a custom message.
Display Table’s Row Data on Dynamically Added Button Click
In the last example, we attached a dummy function sayHi() to the dynamically added ‘View’ button which displays a dummy message to the user upon clicking.
But we can also display the real data of the row i.e. the first name and the last name of the corresponding row on button click.
To achieve that we have to pass the index of the row whose ‘View’ button is clicked to the sayHi() function as an argument. This row index can later be used to get the data of the corresponding row.
See the updated version of the above code which displays the first and last name data of the row on clicking:
let buttonAdder = document.getElementById('addBtn');

// Fires on button click
buttonAdder.addEventListener('click', function (event) {

    let table = document.getElementById('userTable');
    let rows = table.rows;

    // Loop through each row(except the header)
    for (let i = 1; i < rows.length; i++) {

        let cols = rows[i].cells;
        let lastCol = rows[i]['cells'][cols.length - 1];

        // Create a new button element
        let button = document.createElement('button');
        button.innerText = 'View';

        // Attach sayHi() function to 'onclick' attribute & pass row index
        button.setAttribute('onclick', `sayHi(${i})`);   // modified

        // Append the button to the last column
        lastCol.appendChild(button);

    }
});


// Fires on 'View' button click
function sayHi(rowIdx) {
    let table = document.getElementById('userTable');
    let rows = table.rows;

    // Extract first & last Name
    let firstName = rows[rowIdx]['cells'][0].innerText;
    let lastName = rows[rowIdx]['cells'][1].innerText;

    alert(`Hi ${firstName} ${lastName}`);

}
After running the above code, you will get the following output:

As you can see, now the actual data of the row is displayed on the ‘View’ button click instead of the custom message.
Conclusion
Adding a button to the HTML table dynamically is quite simple with JavaScript. You can create the button with the document.createElement() method and then append it to any specific column of the table using the appendChild() method.
If you want to add the button to multiple columns, you can loop through them using a for or while loop and then append it to any number of columns you want.
Thanks for reading.

