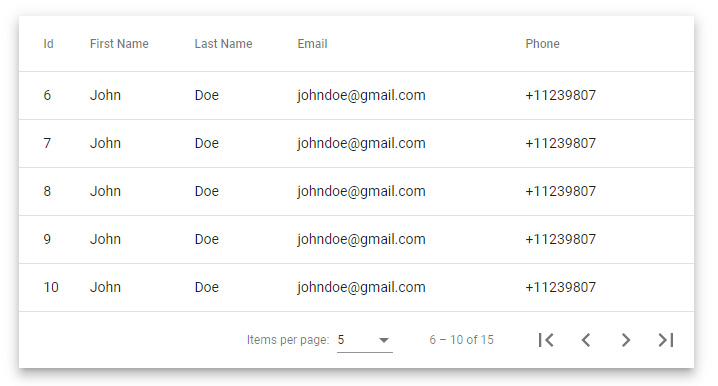
When we have a large number of records in the table, it becomes really difficult to see the entire table data. I mean, you can easily see the first few records but if you want to have a look at the last entries you have to scroll down a lot.
This can take significant time if the number of records in the table is very high. Ultimately, it will result in a bad user experience which is definitely not good for your business.
To avoid this problem, we divide the entire table data into smaller sets or sub-pages and provide navigation so that the user could see any page of the table in just a single click.
To add pagination to a material table in Angular, we use the mat-paginator component of the MatPaginatorModule.
We can add the mat-paginator to the mat-table in the following three steps:
- Import
MatPaginatorModulein your app.module.ts file. - Add mat-paginator to the existing mat-table.
- Assign the paginator property to the mat table datasource.
Let’s understand it with the help of a real-time example.
Step 1: Import the MatPaginatorModule
The very first step is to import the MatPaginatorModule into your app.module.ts file. This will enable us to use all features of the MatPaginator module.
So, open up your app.module.ts file, import the MatPaginatorModule and add it to the imports array:
import { NgModule } from '@angular/core';
import { BrowserModule } from '@angular/platform-browser';

import { AppRoutingModule } from './app-routing.module';
import { AppComponent } from './app.component';
import {MatTableModule} from '@angular/material/table';
import {MatPaginatorModule} from '@angular/material/paginator';

@NgModule({
  declarations: [
    AppComponent,
  ],
  imports: [
    BrowserModule,
    AppRoutingModule,
    MatTableModule,
    MatPaginatorModule
  ],
  providers: [],
  bootstrap: [AppComponent]
})
export class AppModule { }
Step 2: Add mat-paginator to the Mat Table
After importing the MatPaginatorModule, we are ready to use the mat-paginator component in our template file.
As we want to show the pagination at the bottom of the mat table, therefore, we have to add the following mat-paginator code just below the mat table:
<!-- Mat Paginator -->
<mat-paginator
    [pageSizeOptions]="[5, 10, 25, 100]" showFirstLastButtons>
</mat-paginator>
You can also refer to the below sample table to get an idea of where exactly you need to add the mat-paginator. We have added it just after the mat table:
<table mat-table [dataSource]="dataSource" class="mat-elevation-z8">

    <!-- Id Column -->
    <ng-container matColumnDef="id">
        <th mat-header-cell *matHeaderCellDef> Id </th>
        <td mat-cell *matCellDef="let element;">{{element.id}}</td>
    </ng-container>

    <!-- First Name Column -->
    <ng-container matColumnDef="firstName">
        <th mat-header-cell *matHeaderCellDef> First Name </th>
        <td mat-cell *matCellDef="let element"> {{element.firstName}} </td>
    </ng-container>

    <!-- Last Name Column -->
    <ng-container matColumnDef="lastName">
        <th mat-header-cell *matHeaderCellDef> Last Name </th>
        <td mat-cell *matCellDef="let element"> {{element.lastName}} </td>
    </ng-container>

    <!-- Email Column -->
    <ng-container matColumnDef="email">
        <th mat-header-cell *matHeaderCellDef> Email </th>
        <td mat-cell *matCellDef="let element"> {{element.email}} </td>
    </ng-container>

    <!-- Phone No. Column -->
    <ng-container matColumnDef="phone">
        <th mat-header-cell *matHeaderCellDef> Phone </th>
        <td mat-cell *matCellDef="let element"> {{element.phone}} </td>
    </ng-container>

    <tr mat-header-row *matHeaderRowDef="displayedColumns;sticky: true;"></tr>
    <tr mat-row *matRowDef="let row; columns: displayedColumns;"></tr>
</table>

<!-- Mat Paginator -->
<mat-paginator
    [pageSizeOptions]="[5, 10, 25, 100]" showFirstLastButtons>
</mat-paginator>
Step 3: Assign Paginator to Mat Table DataSource
In this step, the first thing we need to do is import the MatPaginator from the paginator library of angular material into our component’s ts file.
import { MatPaginator } from '@angular/material/paginator';
Now we are ready to use the MatPaginator in our component.
Next, we will create a variable paginator which we will later assign to the dataSource of the mat table. This variable will be of type MatPaginator and we will use the @ViewChild() decorator to hold a reference of the mat-paginator that we added to our template file.
Once we have declared the paginator, we can assign it to our mat table’s dataSource inside the ngAfterViewInit() life-cycle hook.
See the following implementation:
import { AfterViewInit, Component, OnInit, ViewChild } from '@angular/core';
import { MatPaginator } from '@angular/material/paginator';
import { MatTableDataSource } from '@angular/material/table';

export class ProductsListComponent implements OnInit, AfterViewInit {

  @ViewChild(MatPaginator) paginator!: MatPaginator;

  displayedColumns = ['id', 'firstName', 'lastName', 'email', 'phone'];
  dataSource = new MatTableDataSource<any>(DATA_SOURCE);

  constructor(private router: Router) { }

  ngOnInit(): void {}

  ngAfterViewInit(): void {
   // Assign the paginator to table datasource
    this.dataSource.paginator = this.paginator;
  }

}
That’s it. Now if you compile your application, the paginator will be visible at the bottom of the mat table.
Here is a sample output with mat-paginator:

You can now use the previous and next buttons to navigate to any specific record. OR, if you want to see the last entry of the table, you can directly click on the last page button.
Conclusion
In this article, we have learned why we need a paginator if we have a large number of records in our mat table. Also, we learned how we can add pagination to a mat table using the mat-paginator of Angular in a few simple steps.
Thanks for reading.

